Wednesday, October 30, 2013

Lookin' pretty grotesque.

Happy Halloween! (Well, almost) I was sitting at the table, looking at an assortment of polishes for Halloween inspired manis last night, and I was feeling uninspired. I couldn't decide. Orange and black ombre? Green and black with stamps? Stripes? I wanted to do something I hadn't ever done before. It was then that I remembered that I wanted to try a "splatter" mani. The end result is pretty freaky and grotesque.
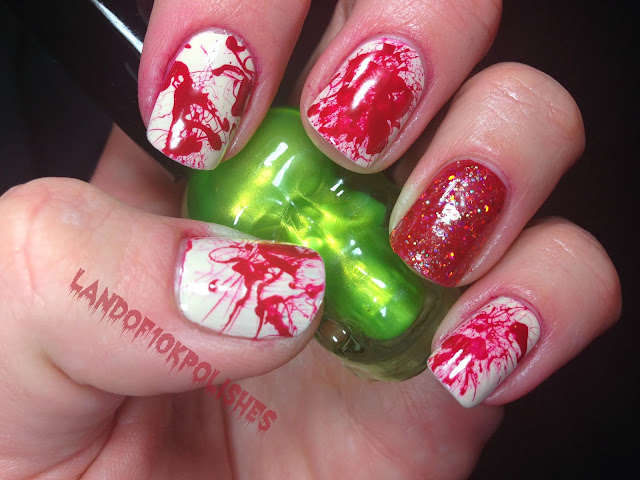
It reminds me of "Dexter". I will just tell you right now that I will definitely think twice before using red in a splatter mani EVER again. I was thinking, "I don't need to tape my cuticles" and "It will be fine if I don't cover the edges of my fingers, I'll just clean it up with acetone". WRONG!! Boy oh boy was I wrong. The end result is super cool, but the during process is a mess. If you are gonna do this, I would HIGHLY recommend masking your cuticles first. My hands legitimately looked like I had killed someone!!
Case in point:
YIKES!
Looks like a massacre, right? Maybe that's the point :-)

To achieve this look, you dip a drinking straw into your polish and just cover the very end of it with color. Aim it at your finger, and give a sharp blow! At one point, I got too much polish on the straw and covered the entire tip of my left pointer finger. Anyone that knows how difficult it is to clean up red polish probably knows that a lot of swears came out of my mouth when that happened!!


After cleaning it up, I was much happier with it. 
The glitter on my ring finger is Model City's Bobbing for Apples


I'd like to try a splatter mani again...I'll just try different colors, and DEFINITELY cover the edges first!

HAPPY HALLOWEEN!!


Sunday, October 27, 2013

What's your sign?

I have this thing for Black Cat Lacquer! Their colors are awesome. The names are awesome. They are kinda edgy, and kind of rock and roll. I ordered a couple colors from the "Zodiac" collection, which is a fairly new collection. In this release, there are 12 colors, one for each astrological sign. I got "Cancer", because that's my sign, and "Aquarius" because it looked super awesome. Let's just say I wasn't disappointed.

"Cancer" is a rainbow shimmer base, packed with grey and white glitter of all shapes and sizes. I swatched it on a few different colors and couldn't make up my mind, so I used all the colors!


It went on very smoothly, and evenly for the most part. I did have to fish around a little bit for some of the bigger pieces of glitter, like the moons and stars. Other than that, it's a gorgeous glitter topper that would look great with lots of colors!

Up next is "Aquarius", this is a dark purple jelly with a MAJOR assortment of glitters! Large circles, flakes, stars, diamonds and micro glitter. I've decided I have a love/hate relationship with this one. The color is GORGEOUS, I mean like, major "WOW" factor. The application, however, was a little frustrating for me. This polish felt a little thick for my liking, but my guess is it's because there is so much glitter in there. Once I put my topcoat on, it seemed to be just fine!

It really is a beauty isn't it? The weirdness in the application definitely won't stop me from wearing it! 

So, what's your sign? Go check out the Zodiac collection and see if your color is one that you like!


Wednesday, October 23, 2013

I'm feeling SUPER sparkly today!

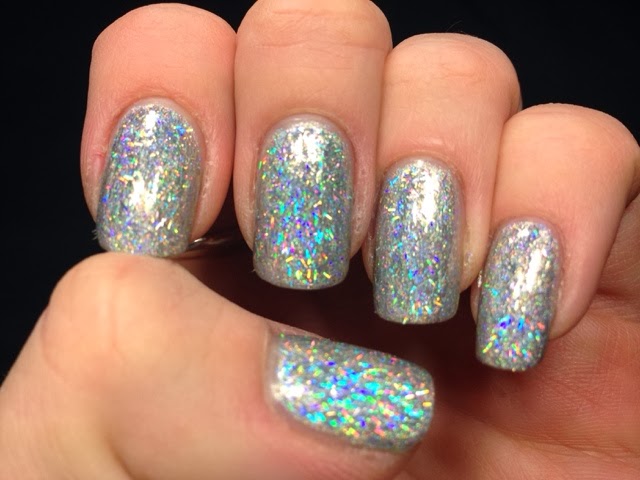
I had the itch to do something super sparkly and eye catching, and I think this polish combo did the trick!
I first used Color Club's "Harp on it" followed by two coats of Venique's "Magical Potions" and finally, "Fairy Dust" by China Glaze. That Venique polish is what gives that "wow" factor. It's a glitter topper with silver holographic bar glitter. It is fabulous! I can't stop staring at my nails.
"Magical Potions" is a holiday color, so I'm sure it won't be available forever! In my opinion, it's a must have if you like sparkle!!

Monday, October 21, 2013

Makeup Assassin's 1000 likes giveaway!

This blogging thing has been so fun for me! I have been introduced to a whole new side of social networking! I was introduced to miss Kimi from Makeup Assassin and she asked me if I wanted to participate in their "1000 likes giveaway". There are lots of prizes goin on over there...really AWESOME prizes, if I do say so myself...
Head over there and check it out. I have decided to participate in that I will be awarding a winner with two polishes of choice from Black Cat Lacquer! Good luck!


Sugar skulls and Ultra Chromes!

I'm back with another fabulous multi-chrome by ILNP! This time, I've used Mutagen, a green that also has purple, silver and some gold! After the last post where I used Birefringence, I had to get my hands on another one of these color shifting polishes!


Also, I have been itching to do some nail art...so I added some sugar skulls! I used my dotting tools to create these, and I really like the way it turned out. For the glitter pieces I used a stick pin to pick up some larger pieces of glitter from a couple of my glitter polishes. I've got some nail art brushes that are on order, and I think they would be great for painting more detailed sugar skulls.
 The dotting tool worked really well, in my opinion.

Mutagen isn't quite as shifty and Birefringence is, but it's still lovely. At this angle you can see the
 grayish, purple tones in it. This polish is relatively sheer and for my nails in these pics, I used three thin coats.


This one is taken outdoors, in clouded sunlight.

This is artificially lit, with the camera flash on. The more light on this color, the more the silvers and gray greens come out. Have you checked out ILNP.com yet? Go get some Ultra Chromes before they're gone!

Thursday, October 17, 2013

What a "killer" mani!

I ordered some water slide decals that I was DYING to use, and I thought, what better polish to pair it with than Model City's "Ghost Stories". This polish is so beautiful. It's smokey, AND it's sparkly. As you may or may not know, I'm a huge Model City fan and this color is the perfect example why.


I just looooooove a good holographic polish, don't you?


As for the crazy, Freddy Kruger pointer finger...I dunno what to tell you. I found some "Horror Movie" water slide decals on Etsy, and wanted to give them a try. Let me tell you...have some patience when you try them. This was my first attempt with these, and I keep thinking that there are so many possibilities. There are LOTS of cute decals on Etsy.


Not a perfect application, kinda crazy and fun though...right?


Monday, October 14, 2013

Oh man, this is a good one...

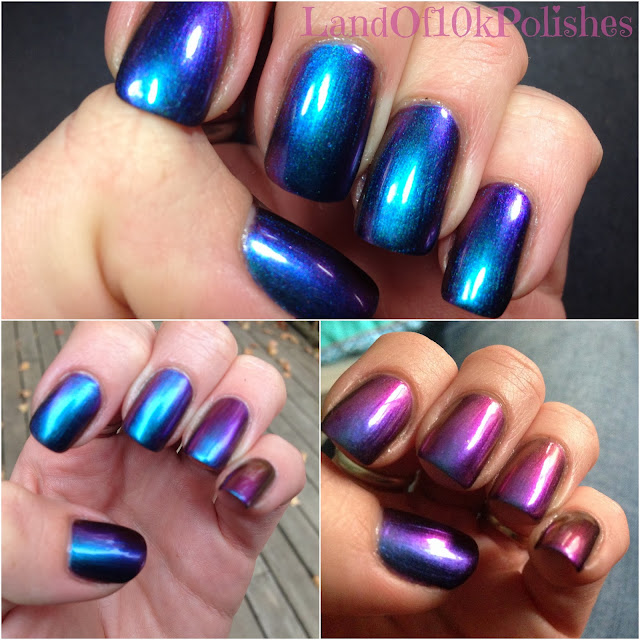
Talk about exceeded expectations! This is "Birefringence" by ILNP. This polish was at the top of my wish list, and for some reason I just kept putting off buying it. I wish I hadn't waited so long!!! It's GORGEOUS! In terms of color shifting, there's turquoise, blue, purple, magenta and a little hint of green-gold in certain lights! In my pictures I have two coats of polish and one coat of Seche Vite.
Those are all pictures of the same polish! Cool, right? This is one of four polishes in ILNP's  "Ultra Chromes" collection. Now I know that there are three other polishes to add to my wish list. It's got a great consistency, it took only two coats for great coverage.
 I took all my pictures in varying lights because it looked different in every place I went! 
 From what I understand, once they're gone, they're gone. Get them while you can, they are so worth it!


Sunday, October 13, 2013

Sponge gradient mini tutorial

Alright, here it is. My personal favorite technique, the sponge "gradient" or sponge "ombre" manicure. I have put together a little collage with all the steps in order. I will detail these steps after the picture collage.
1. Start with a base coat. 75% of the time I choose white. Let it completely dry.
2. Select your colors. I chose the three primary colors so that I could show how they will 
blend into a sort of "rainbow" effect.
3. Mask off your skin with tape. (or chapstick, or vaseline, or elmers glue) It makes cleanup WAY easier.
4. Paint your colors directly onto the sponge. 
5. Sponge the colors onto the nail. 
6.It won't look quite right just yet, don't worry, it 
will after a few more coats.
7. 4th and final sponging
8. Remove the tape and use a brush dipped in acetone to do your cleanup,
9. Add topcoat and bask in the glory of your sponged ombre nails!

What do you think? Will you be trying some sponged gradient nails on yourself?


Friday, October 11, 2013

Had to make my mani a little spookier (Bonus post!)

Good evening! The leopard spots were cool and everything, but I want to try out as many options with my gradient as I can. I was thinking I should be trying to practice my stamping skills, seeing as how I do have a Halloween stamping plate in my stash. Let me tell you, I swore a LOT while trying to stamp this time. A lot.

All that swearing for one stamped finger. Still looks cool though. Right? My cuticles look tore up, I had to use a lot of acetone since I kept screwing up that ONE. DAMN. FINGER. My colors are China Glaze "Sun of a Peach" for the orange, Hard Candy "Black Tie Optional" and Konad black stamping polish.

Time to go practice my stamping skills! 

Snow leopard tutorial!

I was reminded yesterday that I was kinda slackin on the blog posts...so here we are! I'd been wanting to do a sponge gradient for awhile and I thought I would mix it up with some leopard spots too! Both of these techniques are super easy, you just have to have the right tools! 
First, you'll need to choose a color scheme. Second, paint a base that corresponds with the colors you want to use. Use a large dotting tool to make spots of various sizes. At first glance,
 they kinda look like cow spots, don't you think? 
After you have dotted your spots, use a small brush or dotting tool to make "C" shapes on either side of your spot. Remember, it doesn't have to be perfect! To fill space, I added some dots too.
After I finished my spots, I did my sponged gradient. 
Ta daaaaa! Here's the finished product! This gradient is giving me some inspiration for some Halloween type nail art! Look for a gradient tutorial in my next post :-)

Monday, October 7, 2013

Beautiful Blue Bargain!!

I just want to say first and foremost...I am in LOVE with this polish. I am in love with it for a few reasons. My inner high schooler is screaming, "YES!!!! BLUE NAIL POLISH!!!!". I have been searching for just the right blue for awhile. It was $2.99. TWO DOLLARS AND NINETY-NINE CENTS!!!

 I had my eye on Essie's "Butler Please" for quite awhile, and it was in my hand at Walgreens. I was headed for the register when I passed the Sinful Shine display and this blue beauty caught my eye. 
Side by side it is IDENTICAL to butler please, and it is $5 cheaper. Bonus!
 Needless to say, this polish is gorgeous. It is extremely opaque, and took two coats for a nice finish. I've always had good luck with other Sinful "colors" and I anticipate that this one will be the same.

Go hit up your local Walgreens and pick up some for yourself!!!

Friday, October 4, 2013

Green Monster Mash mani!

Happy Friday everyone! So sorry it's been awhile since my last post. We bought a house, so my last week has consisted of getting out from under a massive pile of boxes...boxes that still need to be unpacked. All I had wanted to do last night was sit and relax and paint my nails, so I did! 

I've been waiting for October to come so I could start doing some Halloween inspired nails. I picked up a few of the polishes in the China Glaze Monster's Ball collection and used one for today's post!
First I applied two coats of Zoya's Josie. This color is part of Zoya's summer collection, but I thought it was suitable for use in a monster type manicure. I'd been eyeing it for awhile, and decided it was time to add it to my collection. For some reason, I've been on the hunt for some good greens and I really like this one!
On top of my color I added two coats of China Glaze's "Boo-gie Down". This polish is super cool! I can think of a zillion other ways to use this chunky glitter topper.
In this bottle there is a clear base filled with large and small black hex glitter, black bar glitter, medium and small metallic copper glitter and medium white glitter. It's definitely not only for fall mani's. You could use it in so many ways!


What do you think? Is it monster-ey enough for you??